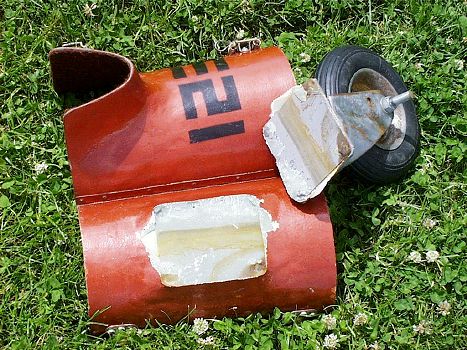
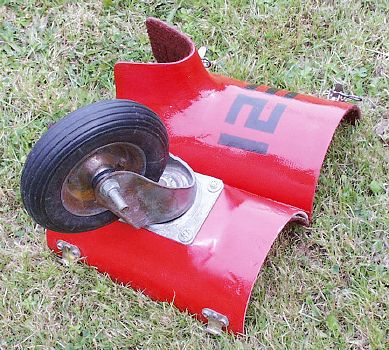
The damaged dolly showing the body filler fracture, corrosion of the non-bonded area and the sheared edges of the glass cloth layer.
This page was written as a warning about possible tail dolly problems. If your tail dolly is not a factory item supplied with the glider or you haven't made it yourself beware: this could happen to you too.
My ASW-20 came with a non-factory tail dolly. It looked reasonably well made so I used it without another thought. However, when the glider was being towed back across the airfield behind a car the dolly failed as the car was stopping. The wheel, which is attached to the draw bar, sheared off the dolly. The glider continued to roll forward, smashing the rudder on the back of the car. This type of accident is not uncommon, and is usually the result of a badly made dolly or of using inappropriately small or weak latches to secure the halves of the collar round the glider's tail boom.
The rest of the page analyses this dolly failure and describes what I consider to be a better way of making these items.
|
|
The damaged dolly showing the body filler fracture, corrosion of the non-bonded area and the sheared edges of the glass cloth layer. |
Structurally, the collar that fits round the tail boom is fibreglass. A flat surface had been built up on it with car body filler. A metal plate, which forms the only attachment for the wheel assembly, was bonded onto the body filler, evidently by putting it in place while the filler was still setting up. The dolly was completed by a single layer of fibreglass over the entire assembly. Captive bolts attached the wheel assembly to the plate through the final fibreglass layer.
The photo shows that the plate was only bonded to the body filler over 15% of its total area. Light surface corrosion on the plate and matching discolouration of the body filler confirms this diagnosis. When the body filler eventually fractured the layer of fibreglass cloth sheared all round the edge of the plate and the wheel and draw bar fell off the dolly.
An ASW-20 weighs 255 kg empty. The entire braking load of the
glider was being taken in shear by a 100mm by 20 mm area of car
body filler and a single layer of 200 gsm glass cloth. It's clear
from this that the tail dolly represented an accident looking for
a place to happen whenever the glider was being towed by a
car.
I am a model aircraft builder with considerable experience of creating high-strength structures and glue joints from composite materials and epoxy. So, I decided to rebuild the dolly myself after discussing the matter with knowledgeable club members and Peter Wells of Zulu Glasstech.
 |
|
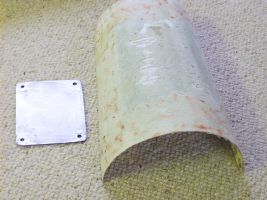
Cleaned up collar and mounting plate |
 |
|
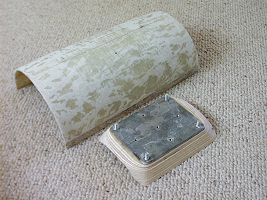
Ready to re-install the wheel mounting. The M6 captive bolts and the five tapped M4 holes can be seen in the steel plate. |
 |
|
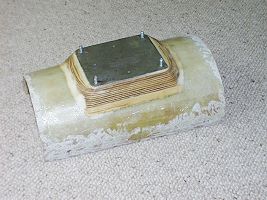
Completed wheel mounting. Ready for finish sanding and painting. |
The collar was sound though a bit thin, so the first step was to remove the interior carpet, body filler, latches and paint from the bottom half of the collar. Body filler is a real pain to remove without damaging the underlying structure. In the end I cut into it with a coping saw in parallel slits about 2-3 mm apart, chipped these off with a chisel-knife and then removed the remainder with a Surform tool. The Surform was also used to get the paint off: most paint strippers capable of tackling enamel paint also attack polyester resins. The wheel assembly mounting plate was cleaned up with emery cloth and de-greased with acetone after the old mounting bolts had been removed.
The next step was to stiffen and thicken the collar so that screws could be countersunk into the laminate without weakening it. The bottom half of the collar was built up using four layers of 200g mat with two layers of twill weave 100g cloth on the outside. The lay-up was cured in a vacuum bag to ensure that the laminations were properly compacted. After cleaning up flash and finishing the surface the thickness had increased from 2.8 mm to 4.5 mm and the piece was much stiffer.
The wheel attachment plate was epoxied to a piece of 6mm 5-ply. The M6 bolts that retain the wheel assembly pass through both the ply and the steel plate with a length of 1 mm steel wire epoxied into the screwdriver slots to prevent the bolts from turning.
Three additional laminations of 6mm ply were shaped to fit the bottom of the collar and glued onto the main ply plate. When the glue was dry the outside was shaped to a smooth contour with a coping saw and a Permagrit sanding block. The block was drilled and tapped for five M4 bolts and the inside of the collar was countersunk to accept the bolt heads.
The wheel mounting was glued to the collar with 24 hour epoxy and the M4 bolts tightened down. When the epoxy had set the ends of the bolts were cut off flush with the surface of the steel plate. The wheel mounting was faired to the collar with small pieces of balsa and spackle and sanded to smoothly blend the shapes. Two layers of twill weave 100 gsm glass cloth were applied with epoxy laminating resin to weatherproof the wheel mount. Holes were cut to slip them down over the M6 bolts. It was necessary to make slits from the edge of each cloth layer to the corners of the steel plate so the cloth would smoothly follow the complex 3D shape. The first layer was slit at right angles to the dolly axis and the second was slit parallel to the axis. By ensuring that the slits did not overlap a neater and more weatherproof finish was achieved.
After the epoxy had hardened the assembly was finish sanded with a Permagrit block followed by 240 grit paper on a cork block before being sprayed with primer. The top part of the collar was re-attached to the hinge, the ID numbers and the interior masked, and the complete dolly was sprayed red.
I inspected the latches that keep the dolly locked round the tail boom. Over-centre latches, especially those with securing pins or catches, are not easy to find. However, RS Components supply a good selection of suitable latches. I was able to find the old latches in their catalogue, check their specifications, and decide that they were adequate for the task. In consequence the job was completed by re-installing the original latches, gluing the carpet back inside the lower collar with Copydex and re-installing the wheel with nylock nuts.
 |
|
The rebuilt tail dolly. |